You already decided phones can cover practice timing. This post is the setup: two Android phones, one start mark, one finish mark, and a finish phone that sits about 90 cm beside the lane, not on it.
If you still need the why (phones vs lasers, practice grade vs FAT), read the decision guide and the compare page. Below is the how.
SpeedTrackr Timing Gates give one practice grade start to finish time per rep. Not certified meet timing. Not intermediate splits.
What you need
- Two Android phones (start + finish)
- A tripod or stable stand for the finish phone
- A clear start mark and finish mark on the ground
- Decent light (harsh backlight and heavy night glare hurt any camera system)
- The SpeedTrackr app from Google Play
Optional but useful: a short cone or tape at the finish so the on-screen line has something obvious to sit on.
The setup at a glance
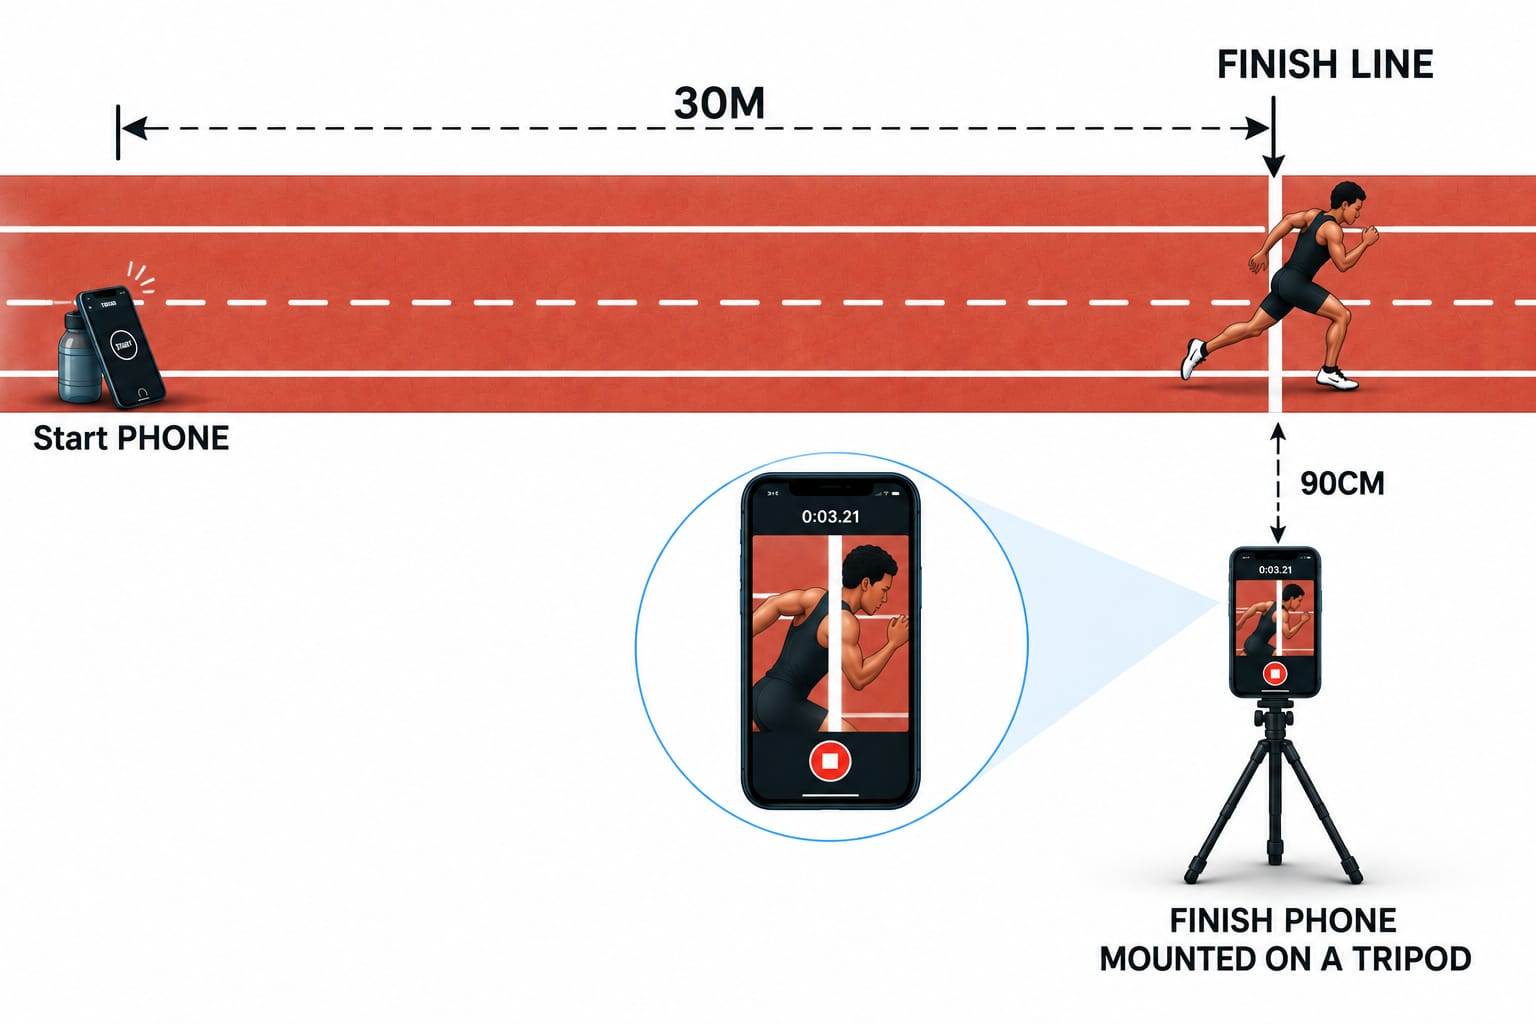
- Start phone at the start mark.
- Finish phone on a tripod about 90 cm from the lane edge (sideways offset).
- Finish phone in portrait, still, facing the finish.
- Align the on-screen timing line with the physical finish mark.
- Pair both phones in the app before the first rep.
- Run TEST THE LINE once so the finish phone confirms it is ready.
Step 1: Place the start phone
Put the start phone at the start mark. Flat on a safe prop or a low stand is fine. Keep it out of the athlete’s path and far enough that a block push or false step does not kick it.
Open Timing Gates on that phone and set it as the start role when the app asks.
Step 2: Mount the finish phone at 90 cm
This is the step coaches get wrong most often.
90 cm is how far the finish phone sits beside the lane, measured from the white line or lane edge sideways to the phone. It is not how tall the tripod is.
- Tripod or stand next to the lane at the finish mark
- About 90 cm offset from the lane edge
- Phone in portrait
- Camera facing the finish so the athlete fills a useful part of the frame as they cross
If the phone sits on the lane line itself, the athlete may never look large enough on screen. Pull it to the side. Keep the runner big in the view.
Step 3: Align the on-screen line
On the finish phone, place the on-screen timing line on the physical finish mark. Tape, a cone edge, or a painted line all work. The goal is simple: the same mark every session so times stay comparable week to week.
Nudge the phone, not the athlete, until the line sits cleanly on that mark. Then leave it alone until the block is done.
Step 4: Light and stillness
Camera timing likes boring conditions:
- Steady tripod (no wobble when someone jogs past)
- Enough light on the finish lane
- Avoid shooting straight into the sun or bright stadium floods behind the athlete
If a rep looks off, check tilt, line drift, and whether someone walked through the frame before you rewrite the workout.
Step 5: Pair before the first rep
Open Timing Gates on both phones and pair start and finish before anyone crouches. Pairing once per session is cheaper than fixing a half set of untimed reps.
SpeedTrackr is Android first for timing gates. Jump, VBT, and reaction also run on the web for coaches who need them from a browser (including iPhone browsers) at speedtrackr.com/auth/login. Timing gates for this workflow stay on the Android app.
Step 6: TEST THE LINE (public prep)
Before the gun, give the finish phone a quick prep check:
- Tap TEST THE LINE on the finish phone.
- Walk across the finish once at an easy pace.
- Wait for the thumbs-up / spoken confirm when the phone is ready (steady + enough light).
That is prep confidence, not a race. Do it once when you set the stand, then send the athlete.
A clean 30 m example
- Mark 0 m and 30 m.
- Start phone at 0 m.
- Finish phone ~90 cm beside the lane at 30 m, portrait, line on the mark.
- Pair phones.
- TEST THE LINE once.
- Time the block. Same finish mark every rep.
Keep the finish phone where it is between reps. Moving the stand mid-block is how “mystery” slow times show up.
What this timing is (and is not)
It is: practice grade wireless start and finish timing between two Android phones. Useful for full runs and block starts when you want one elapsed time you can trend.
It is not: FAT or federation certified meet timing. It is not intermediate split timing between more than two points. Do not use phone gates as the sole clock for official selection that requires approved timing.
Public materials frame practice consistency around ±0.022s vs a hand stopwatch. Treat that as a consistency claim against stopwatch noise, not as a laser replacement, and not as a guarantee for every surface, light level, or phone model.
After the first good block
Once the stand is dialed:
- Reuse the same finish offset and mark next session
- Export or review times under the athlete in Coach Mode when you use roster features
- Keep hardware gates for championship days if your club already owns them
Many programs mix both: phones for volume, club hardware for big days.
Start here
- Web login for jump / VBT / reaction in a browser: auth/login
Set the finish phone once. Time more reps. Leave meet certification to meet gear.
Put it into practice.
Turn this insight into numbers — time your sprints, measure your jumps, and track your reaction time with SpeedTrackr for Android.
Free 4-week sprint plan.
Join the weekly sprint newsletter and get a research-backed 100m training blueprint — acceleration, max velocity, plyometrics, and speed endurance. Instant download.
Weekly, no spam. Unsubscribe anytime.